The Best Fluffy Pancakes recipe you will fall in love with. Full of tips and tricks to help you make the best pancakes.
In the previous article, we learnt the implementation of Spring Security using In-Memory configuration for authenticating users. In this example, we will learn to authenticate users and roles against database tables.
If you are new to Spring Security, I highly recommend you go through the basics of Spring Security .
Implementation
To implement Spring Security, we will take the help of WebSecurityConfigurerAdapter. To enable Spring security, we need to annotate our configuration class with @EnableSpringSecurity and @Configuration.
In this example, we will be using the H2 in-memory database to store our user credentials and fetch those credentials to authenticate. And we will add our user credentials to the database during the application start-up using @PostConstruct annotation.
@PostConstruct
	public void setup() {
		userRepositoty.save(new UserEntity(1, "[email protected]", passwordEncoder.encode("shail@123"), "ROLE_ADMIN"));
		userRepositoty.save(new UserEntity(2, "[email protected]", passwordEncoder.encode("john@123"), "ROLE_USER"));
	}
To authenticate our users against a database table we will be using DaoAuthenticationProvider class and UserDetailsService interface.
DaoAuthenticationProvideris one of the implementations ofAuthenticationProviderwhich takes the help ofUserDetailsServiceto retrieve username and password for authenticating the user.UserDetailsServiceinterface has one read-only methodloadUserByUsername(). We override this method to write our logic to fetch data from the database.
@Component
public class UserDetailsServiceImpl implements UserDetailsService {
	@Autowired
	private UserRepository userRepository;

	@Override
	public UserDetails loadUserByUsername(String username) throws UsernameNotFoundException {
		UserEntity user = userRepository
										.findByUsername(username)
										.orElseThrow(() -> new UsernameNotFoundException("INVALID USERNAME"));

		UserDetails userDetails = new User(username, user.getPassword(), AuthorityUtils.createAuthorityList(user.getRole()));

		return userDetails;
	}
}
We need to override the configure() method of WebSecurityConfigurerAdapter which takes AuthenticationManagerBuilder as a parameter. AuthenticationManagerBuilder has a method ““authenticationProvider()which takes an AuthenticationProvider as a parameter; we will pass ourDaoAuthenticationProviderobject as an argument to this method. We also need to tell our ``DaoAuthenticationProvider about ourUserDetailsServiceImpl“` and the password encoder we will be using.
@Override
    public void configure(AuthenticationManagerBuilder auth) throws Exception {

		DaoAuthenticationProvider daoAuthProvider = new DaoAuthenticationProvider();
		daoAuthProvider.setPasswordEncoder(passwordEncoder());
		daoAuthProvider.setUserDetailsService(userDetailsServiceImpl);

		auth.authenticationProvider(daoAuthProvider);

    }
We also need to override another configure() method of WebSecurityConfigurerAdapter which takes HttpSecurity as a parameter.
Here we will configure our basic security parameter for different URI patterns and roles allowed on those URI patterns.
@Override
	public void configure(HttpSecurity http) throws Exception {
		// @formatter:off

		http
			.httpBasic().and()
			.authorizeRequests()
			.antMatchers("/h2-console/**").permitAll()
			.antMatchers("/api/admin/**").hasRole("ADMIN")
			.antMatchers("/api/user/**").hasRole("USER")
			.antMatchers("/api/any/**").hasAnyRole("ADMIN", "USER")
			.anyRequest()
			.authenticated()
			.and().formLogin().disable();

		http.csrf().ignoringAntMatchers("/h2-console/**");

		http.headers().frameOptions().sameOrigin();

		// @formatter:on

	}
Testing
To test our implementation let’s create a simple controller with some GetMapping which return different messages.
@RestController
@RequestMapping(value = "api")
public class MessageController {

	@GetMapping(value = "/admin/message")
	public String adminMessage(Authentication auth) {
		String role = "";
		for (GrantedAuthority gauth: auth.getAuthorities()) {
				role = gauth.getAuthority();
		}
		return "<h1>Hello, "+ auth.getName()+ " you are "+ role+"</h1>";
	}

	@GetMapping(value = "/user/message")
	public String userMessage(Authentication auth) {
		String role = "";
		for (GrantedAuthority gauth: auth.getAuthorities()) {
				role = gauth.getAuthority();
		}
		return "<h1>Hello, "+ auth.getName()+ " you are "+ role+"</h1>";
	}

	@GetMapping(value = "/any/message")
	public String anyMessage(Authentication auth) {
		String role = "";
		for (GrantedAuthority gauth: auth.getAuthorities()) {
				role = gauth.getAuthority();
		}
		return "<h1>Hello, "+ auth.getName()+ " you are "+ role+"</h1>";
	}
}
Let’s now try to consume these APIs using Postman.
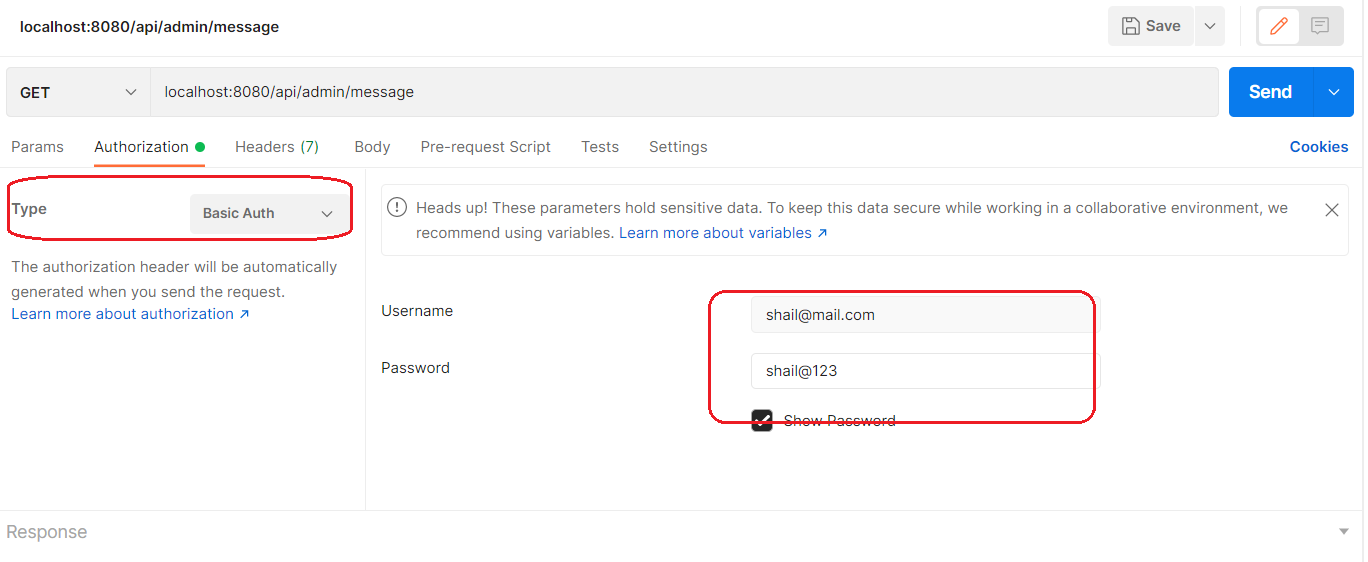
Enter the request URL as http://localhost:8080/api/admin/message and under the Authorization tab, select Basic Auth and provide the username and password and click send.

On successful authentication, you will be able to access the URL and will get the output as –

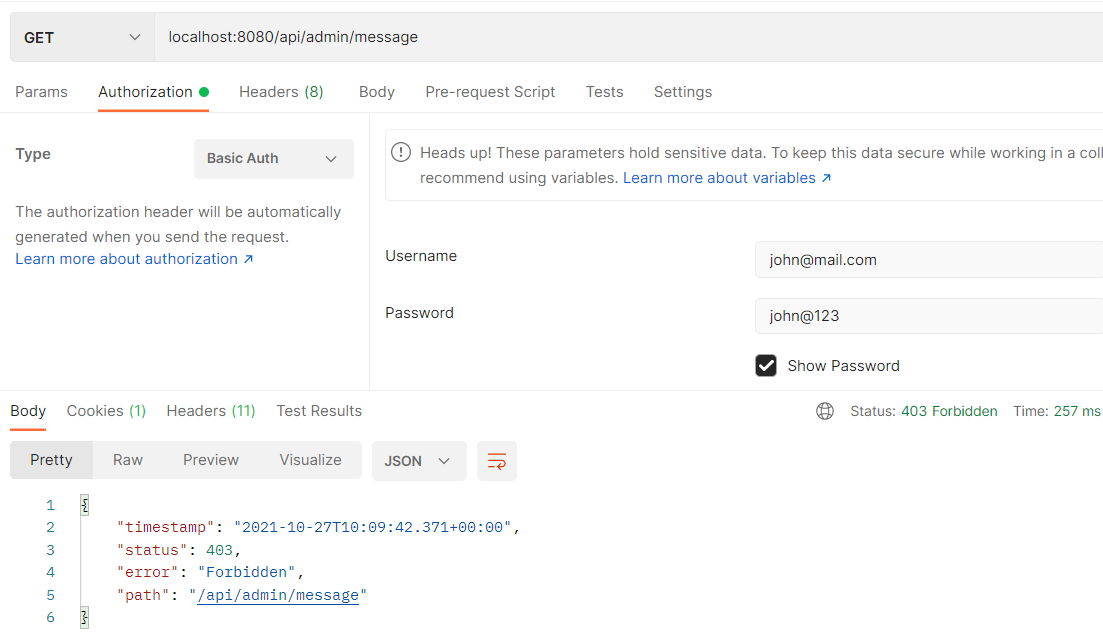
If you will try to login through the [email protected] credential on the above URL, you will get an error with message Forbidden as this is only accessible for the ADMIN role.

I recommend you to try using the other combination credential with the URL resource see the output.
Summary
In this article, we learnt how to implement Spring Security and authenticate users against a database and also how the URL or resource is restricted based on the user role.
In the successive articles in the series, we will continue our learning of Spring Security and see the authentication using JWT with Spring Security.
And last but not the least you can always find the complete source code for the implementation @ Github
